I’m so excited for Spring. It’s personally my favorite time of the year for two reasons, bright colors and my birthday!! ^_^

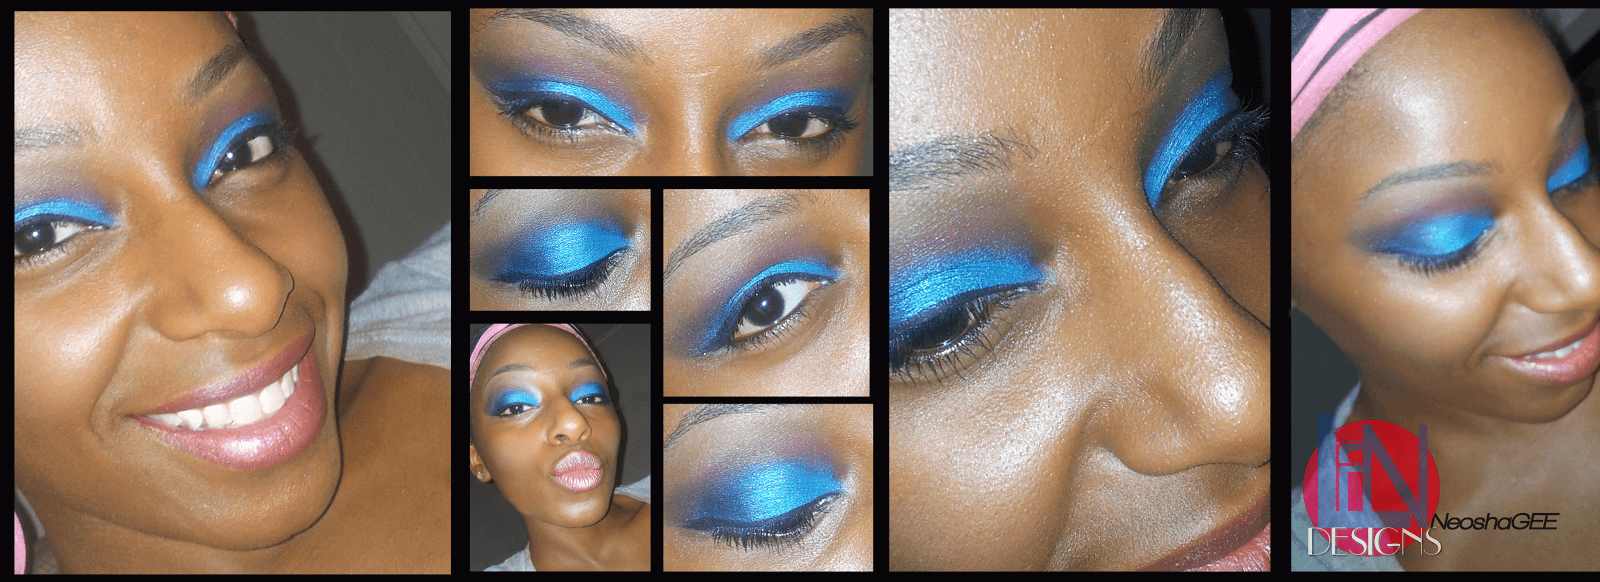
I hadn’t done a tutorial for my Youtube in forever so I decided to post one earlier today. In celebration for Spring fashion and makeup trends, I created a fun look that any girl can rock. I’ve heard so many people say that women of color can’t pull off certain looks. Honey, we are chameleons! Beauty knows no value or prejudice. Makeup is creativity. We all have the right to fulfill whatever creative spark we desire. Using this bold and vibrant color on my eyes made me feel GREAT! Want to see how I transformed for Spring? Check out this post for a more detailed description of my everyday beauty routine and “Blue Spring” tutorial. Enjoy!!
Now, the perfect foundation for a flawless makeup look begins with a very successful facial regimen. I cleanse, exfoliate, and moisturize my face, religiously! The best makeup looks great over clear and healthy skin. No worries, if your skin is not where you would like for it to be, there are many products on the market that can transform your complexion from flaw to perfection in a matter of minutes. If you aren’t really into makeup but would like to experiment, it’s all a matter of trial and error. I taught myself how to apply makeup, blend perfectly, and more just by observing, watching, experimenting, and learning from others. You can too! Let’s begin…
Products Used
- ELF Complete Coverage Concealer (Medium)
- ELF Beauty Makeup Clutch Palette
- ELF 24k Makeup Palette
- Coastal Scents GO Palette (Sydney)
- Maybelline Liquid Foundation
- ELF Mineral Infused Mascara
- ELF Black Eyeliner Pencil
- ELF Pressed Powder (Almond)
- ELF Cream Liner (Black)
- NK Auto Eye Liner
- Covergirl Queen Collection Lipstick (Cool Khaki)
- Covergirl Continuous Color Lipstick (Rose Cashmere)
Who says you have to spend an arm and a leg on expensive beauty products to get the same results? No way! This is what I did..
How I did Cheapskate Makeup
- Start with a clean face. Layering makeup onto dirty skin is a mixture of disaster and skin attack.
- After cleansing my face, I applied my Suave Advanced Therapy moisturizing lotion.
- From there, I begin to clean up my eyebrows using my ELF concealer and brow filler from the clutch palette.
- If you’re going for this look, use a black base to apply to your lids. This will serve as a foundation for your blue shadows. I used the NK liner. Using NYX jumbo pencil in black bean also works. 🙂
- Taking a matte brown or whatever matte color shadow within the same family as your skintone, apply to your crease area. Once applied, take the darkest blue eyeshadow (ELF clutch) and apply underneath crease and outer “V”.
- Taking the second blue (Coastal scents), apply to mid eye area in circular motion. Packing on color as needed. Take your third blue (ELF 24k), and apply to inner corners of your eyes, blending into center.
- BLEND, BLEND, BLEND! You shouldn’t see any harsh lines. Now, go back in with a dark grey or black shadow and place color on the outer “vees” of your eyes. Continue to blend.
- If you need to, use concealer or a q-tip to clean up your lines and erase any mistakes.
- To line the lids of my eyes, I used a cream liner (ELF). Taking an angled brush I began in the center of my lid right against my lash line, drawing light and gentle strokes. In order, I went from center to winged end, to inner corners of my eye. The trick to a perfect line is looking downwards. You don’t want to apply your cream, pencil, or liquid liner too slowly, it will cause more mistakes than you’ll want. You also don’t want to rush it either. Use nice brisk and smooth strokes.
- Using liner? Line your lower water line with a black pencil or liquid. You can also blend this if you would like a more smoky look. At this point, you can curl your lashes and apply mascara. Curling is optional. If you want to apply falsies, go for it!
- Apply your foundation of choice. NOTE: Do not forget to apply foundation below your jawbone and onto your neck area. If using a liquid or cream foundation, be sure to seal with a powder. Whether it’s HD, translucent, etc. It’s your preference. I used the ELF pressed powder in shade, almond.
- For lips, I lined mines with a flesh-toned lip pencil. Lining your lips and filling allows your lip color to have longevity throughout its wear. Perfect if you plan on being out for a while.
- Finally, lip color. I took my nude lipstick (Covergirl Cool Khaki) and applied it gently all over my lips. I didn’t want the color to be be super opaque on my lips so a light coat serves me well. I layered the (Covergirl Rose Cashmere) on top, placing it in the center of my lips. No gloss was needed but if you prefer a gloss or shimmer, you can go for that as well.
FINISHED!!

Yep! I am definitely ready for summer. Be sure to check out all the products I used and more! Are you Makeup Cheapskate chic?!


I love how contrasting this almost electric turquoise blue look. Great inspiration for the spring & a tutorial.:)Someone recently told me that smoky eyes should be done certain way, almost like geometry, how ridiculous!There's no right or wrong when you do your thing.
Thanks so much and you're right. Makeup is an art. Anyone can definitely get as creative as they want to be when playing with various colors, shades, and hues. The same for clothing. Your style should be your own. We all have inspiration. Have fun with it. ^_^
This blue colour is really amazing. Where can I get it in UAE?
10 best concealer pallets